Planar projections
Overview
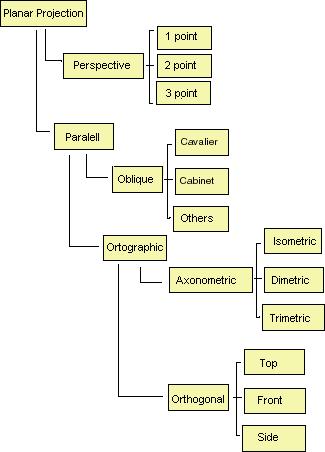
It can be useful to have an overview over the most common projections. The figure below shows a common classification in graphical literature.

The categorization of parallel projections has to be seen in relation to the object (scene) we are going to project. The description of the different projections often refer to the main axes for the object we are going to look at, not necessarily the coordinate axes, x, y and z. If they coincide, and they often do in practice, the reasoning is easier to follow.
The main separation is between parallel projection and perspective projection.
Some terms:
- Eye position
- The projection plane, which is the plane we want to see the projection in.
- Projection lines or projectors are straight lines from the eye position via (corners on) the figure, down on the projection plane.
Points of intersection between these lines and the projection plane describe the projection.
Perspective projection
This is the form of projection that is most natural. Items far away become smaller than those that are closer. Perspective projections are characterized by the gathering of projection lines in one position, the eye position.
The mathematical description of this is discussed in another context. For now we will concentrate on the categorization.
The classification in the 1-, 2-, or 3-point depends on how we place the projection plane in relation to the object's main axes. The categorization is based on the number of disappearing points.
One-point perspective
An open box. We see the box from straight ahead and we have made a projection plane that is parallel with the front side of the box. The eye position is centred, in this case both vertical and horizontal, in relation to the box's front side.

When we draw by hand we can cheat a little bit and see a side as coinciding with the projection plane without the viewer noticing, even though we need to place the eye a little to the side of the front:

Two-point perspective
A closed box. The eye is still centred vertically, but now the projection plane creates a distinct angle with two of the box's main surfaces.

Three-point perspective
A closed box. The eye is no longer vertically centred. The plane is placed in a way to make three of the box's main surfaces visible.

We can with drawing by hand gain an impression of size with projections like these. Below is the start of a drawing of a lighthouse.

Parallel projection
Parallel projections are characterized by parallel projection lines. In mathematical terms we can say that the eye position is infinitely far away.
Orthographic
In orthographic projections the projection lines create straight angles with the projection plane. Which in turn is divided into orthogonal and axonometric.
Orthogonal
In orthogonal projections the projection plane is parallel with the main axes in the object. These are typical widespread projections. The following snapshot from a 3Dstudio session is an example:

Axonometric
The axonometric projections are categorized after the angle the projection plane creates with the main axes. In an isometric projection the angle is the same between the plane and all of the three main axes. In a dimetric two angles are alike and in a trimetric all of the angles are different.
Oblique projections
In skew oblique projections, the projection lines does not form a straight angle with the plane

Two special terms on projections are standardized:
-
Cabinet.
The angle between the projection lines and the plane is about 64 degrees, arctan(2). - Cavalier.
The angle between the projection lines and the plane is about 45 degrees, arctan(1).
Let us use a city plan as en example. We achieve three things with a oblique parallel projection:
- We see more sides on the buildings
- We keep a true angle representation, the streets' angles with each other stay correct.
- If we know the angle, for example cavalier or cabinet, we can in addition measure the correct sizes on surfaces or details on surfaces.


